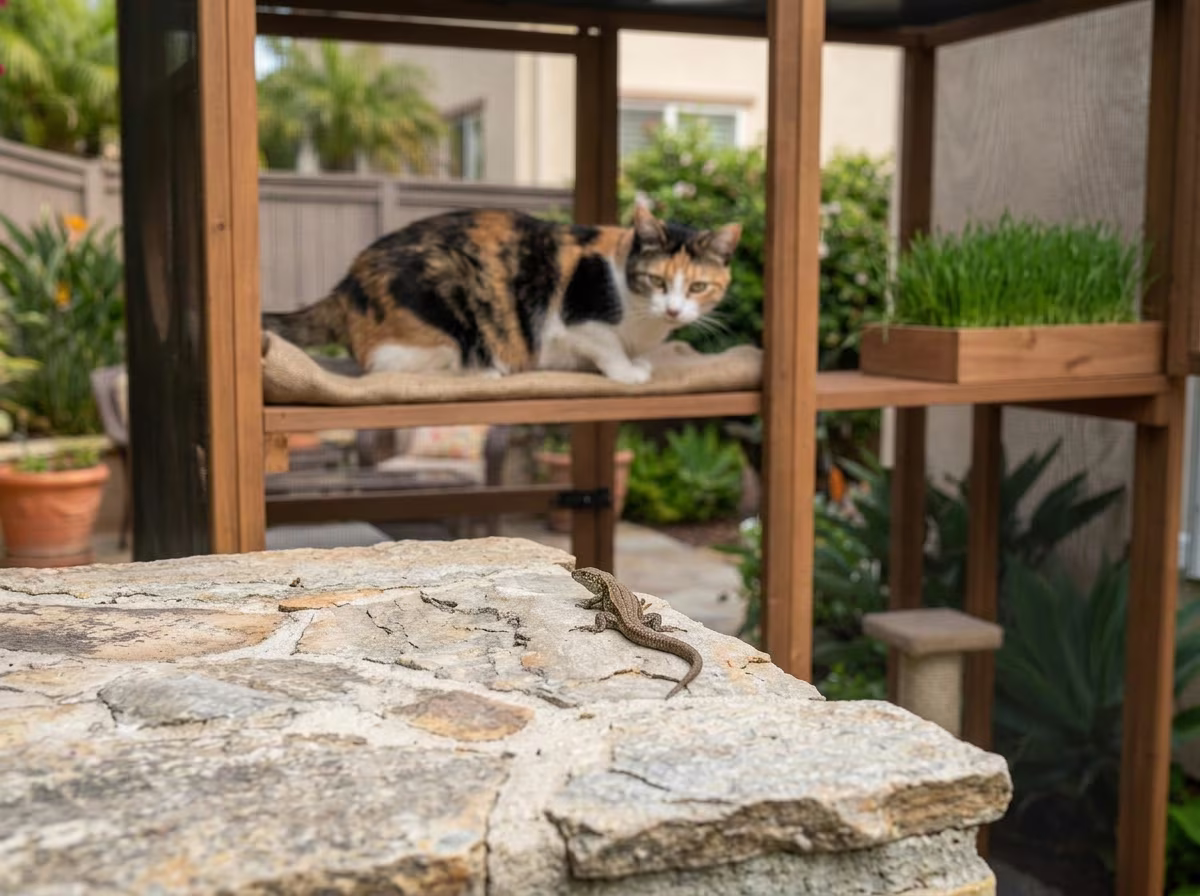
Landscape lighting does more than make your yard look beautiful: it helps your outdoor space come alive after the sun goes down. Thoughtfully placed lighting along paths, patios, and garden features creates a warm, welcoming atmosphere while making the space safer and easier to use at night.
KEY TAKEAWAYS
- Landscape lighting extends your outdoor living season into every evening of the year, and Southern California's 280+ dry nights mean you will use it more than you expect. A layered approach combining path lights, accent lighting, and ambient string lights creates depth, safety, and atmosphere that a single porch light never can.
- The most overlooked opportunity in outdoor lighting is designing for water-wise landscapes. Drought-tolerant plants, gravel pathways, and native California gardens create dramatic lighting effects that traditional lawns simply cannot match, from the sculptural shadows of uplighted agave to the translucent glow of backlit ornamental grasses.
- You do not need to light your entire yard at once. A phased approach starting with pathway safety lighting ($200 to $400) and building toward accent and ambiance over time keeps the project affordable while giving you a finished look from night one.
Why Does Landscape Lighting Change Everything About How You Use Your Yard?
Most yards go dark the moment the sun sets. The patio sits empty. The garden you spent all weekend tending disappears behind a wall of black. A single motion-sensor floodlight snaps on when the dog goes out, casting everything in flat, harsh white before clicking off again. The outdoor space that felt like a retreat at 4 p.m. becomes invisible by 7 p.m.
This guide covers everything you need to change that: the types of landscape lighting that work best in Southern California, design ideas for every part of your yard from the front walkway to the back patio, specific techniques for lighting drought-tolerant and native plant gardens, and a practical phased approach that lets you build your lighting plan over time without breaking the budget. Whether you are starting from scratch or adding to an existing setup, the goal is the same: turn your yard into a place you actually want to be after dark.
What Are the Different Types of Landscape Lighting and Where Does Each One Shine?
Landscape lighting is not a single product. It is a system of different light types working together, each one designed for a specific purpose. Understanding the categories before you buy a single fixture saves you from the most common mistake homeowners make: lighting everything the same way and ending up with a yard that feels either like a parking lot or a cave with bright spots.
The most effective outdoor lighting designs layer three categories: task lighting for safety and navigation, accent lighting for drama and focal points, and ambient lighting for mood and social spaces. Here is how each type works and where it belongs.
Path and Walkway Lights
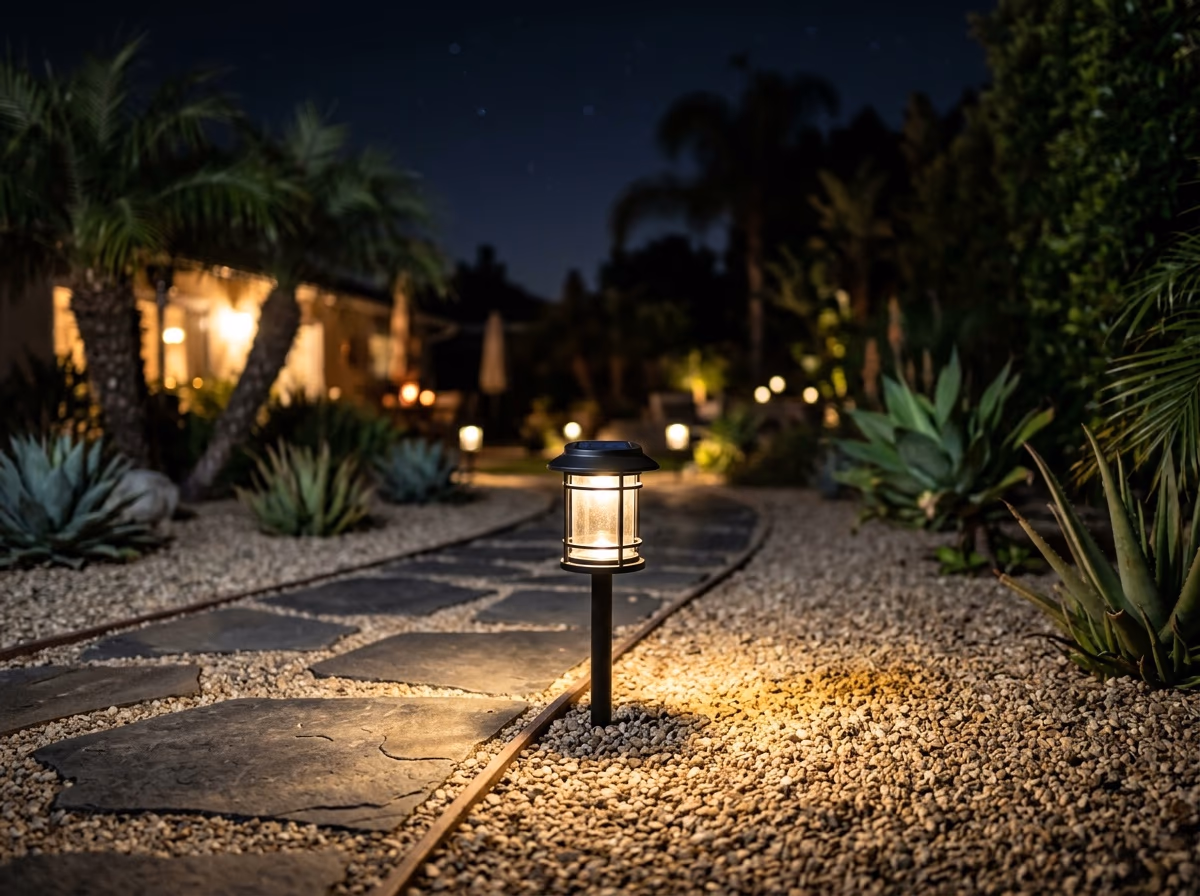
Path lights are the foundation of any landscape lighting plan. They line walkways, driveways, and garden borders with low, downward-facing fixtures that illuminate the ground without creating glare. Proper spacing is six to eight feet apart on alternating sides of a path, creating a gentle rhythm of light and shadow that guides movement naturally.
For water-wise yards with decomposed granite or gravel pathways, path lights serve double duty. The light reflects off the aggregate surface, creating a softer, wider glow than you get on dark mulch or concrete. Low-voltage LED path lights in the warm white range (2700K to 3000K) produce the most natural effect, and modern fixtures draw so little power that a single transformer can run 15 to 20 lights comfortably.
Accent and Uplighting
Accent lights are the artists of your lighting plan. Positioned at ground level and aimed upward, they transform trees, architectural features, and sculptural plants into nighttime focal points. A single well-placed uplight beneath a mature oak creates dappled moonlight patterns across your entire yard. A pair of spotlights flanking your front door adds depth and curb appeal that flat overhead lighting cannot achieve.
In drought-tolerant gardens, uplighting reveals textures and forms that disappear under even lighting. The peeling bark of a manzanita. The geometric rosettes of an agave. The architectural spines of a Mexican fence post cactus. These plants were designed by nature to cast dramatic shadows, and accent lighting is what unlocks that potential after dark.
Uplighting aims the beam straight up from the base of a tree or feature. Spotlighting is similar but uses a narrower beam aimed at a specific element. Grazing places the light close to a textured surface (stone wall, wood fence, bark) so the beam rakes across the surface and emphasizes every ridge and groove.
Downlighting and Moonlighting
Downlighting mounts fixtures high in trees or on structures, aiming the beam downward to simulate natural moonlight. The effect is subtle and elegant: soft, dappled light filtering through branches onto the ground below. It works beautifully in mature gardens where canopy coverage creates natural shadow patterns.
Moonlighting is the gentlest form of landscape lighting and the hardest to overdo. Two or three fixtures mounted 15 to 20 feet up in a large tree can illuminate an entire seating area with a quality of light that feels organic rather than designed. For Southern California yards with mature California oaks, eucalyptus, or pepper trees, this technique produces results that no ground-level fixture can replicate.
String and Ambient Lights
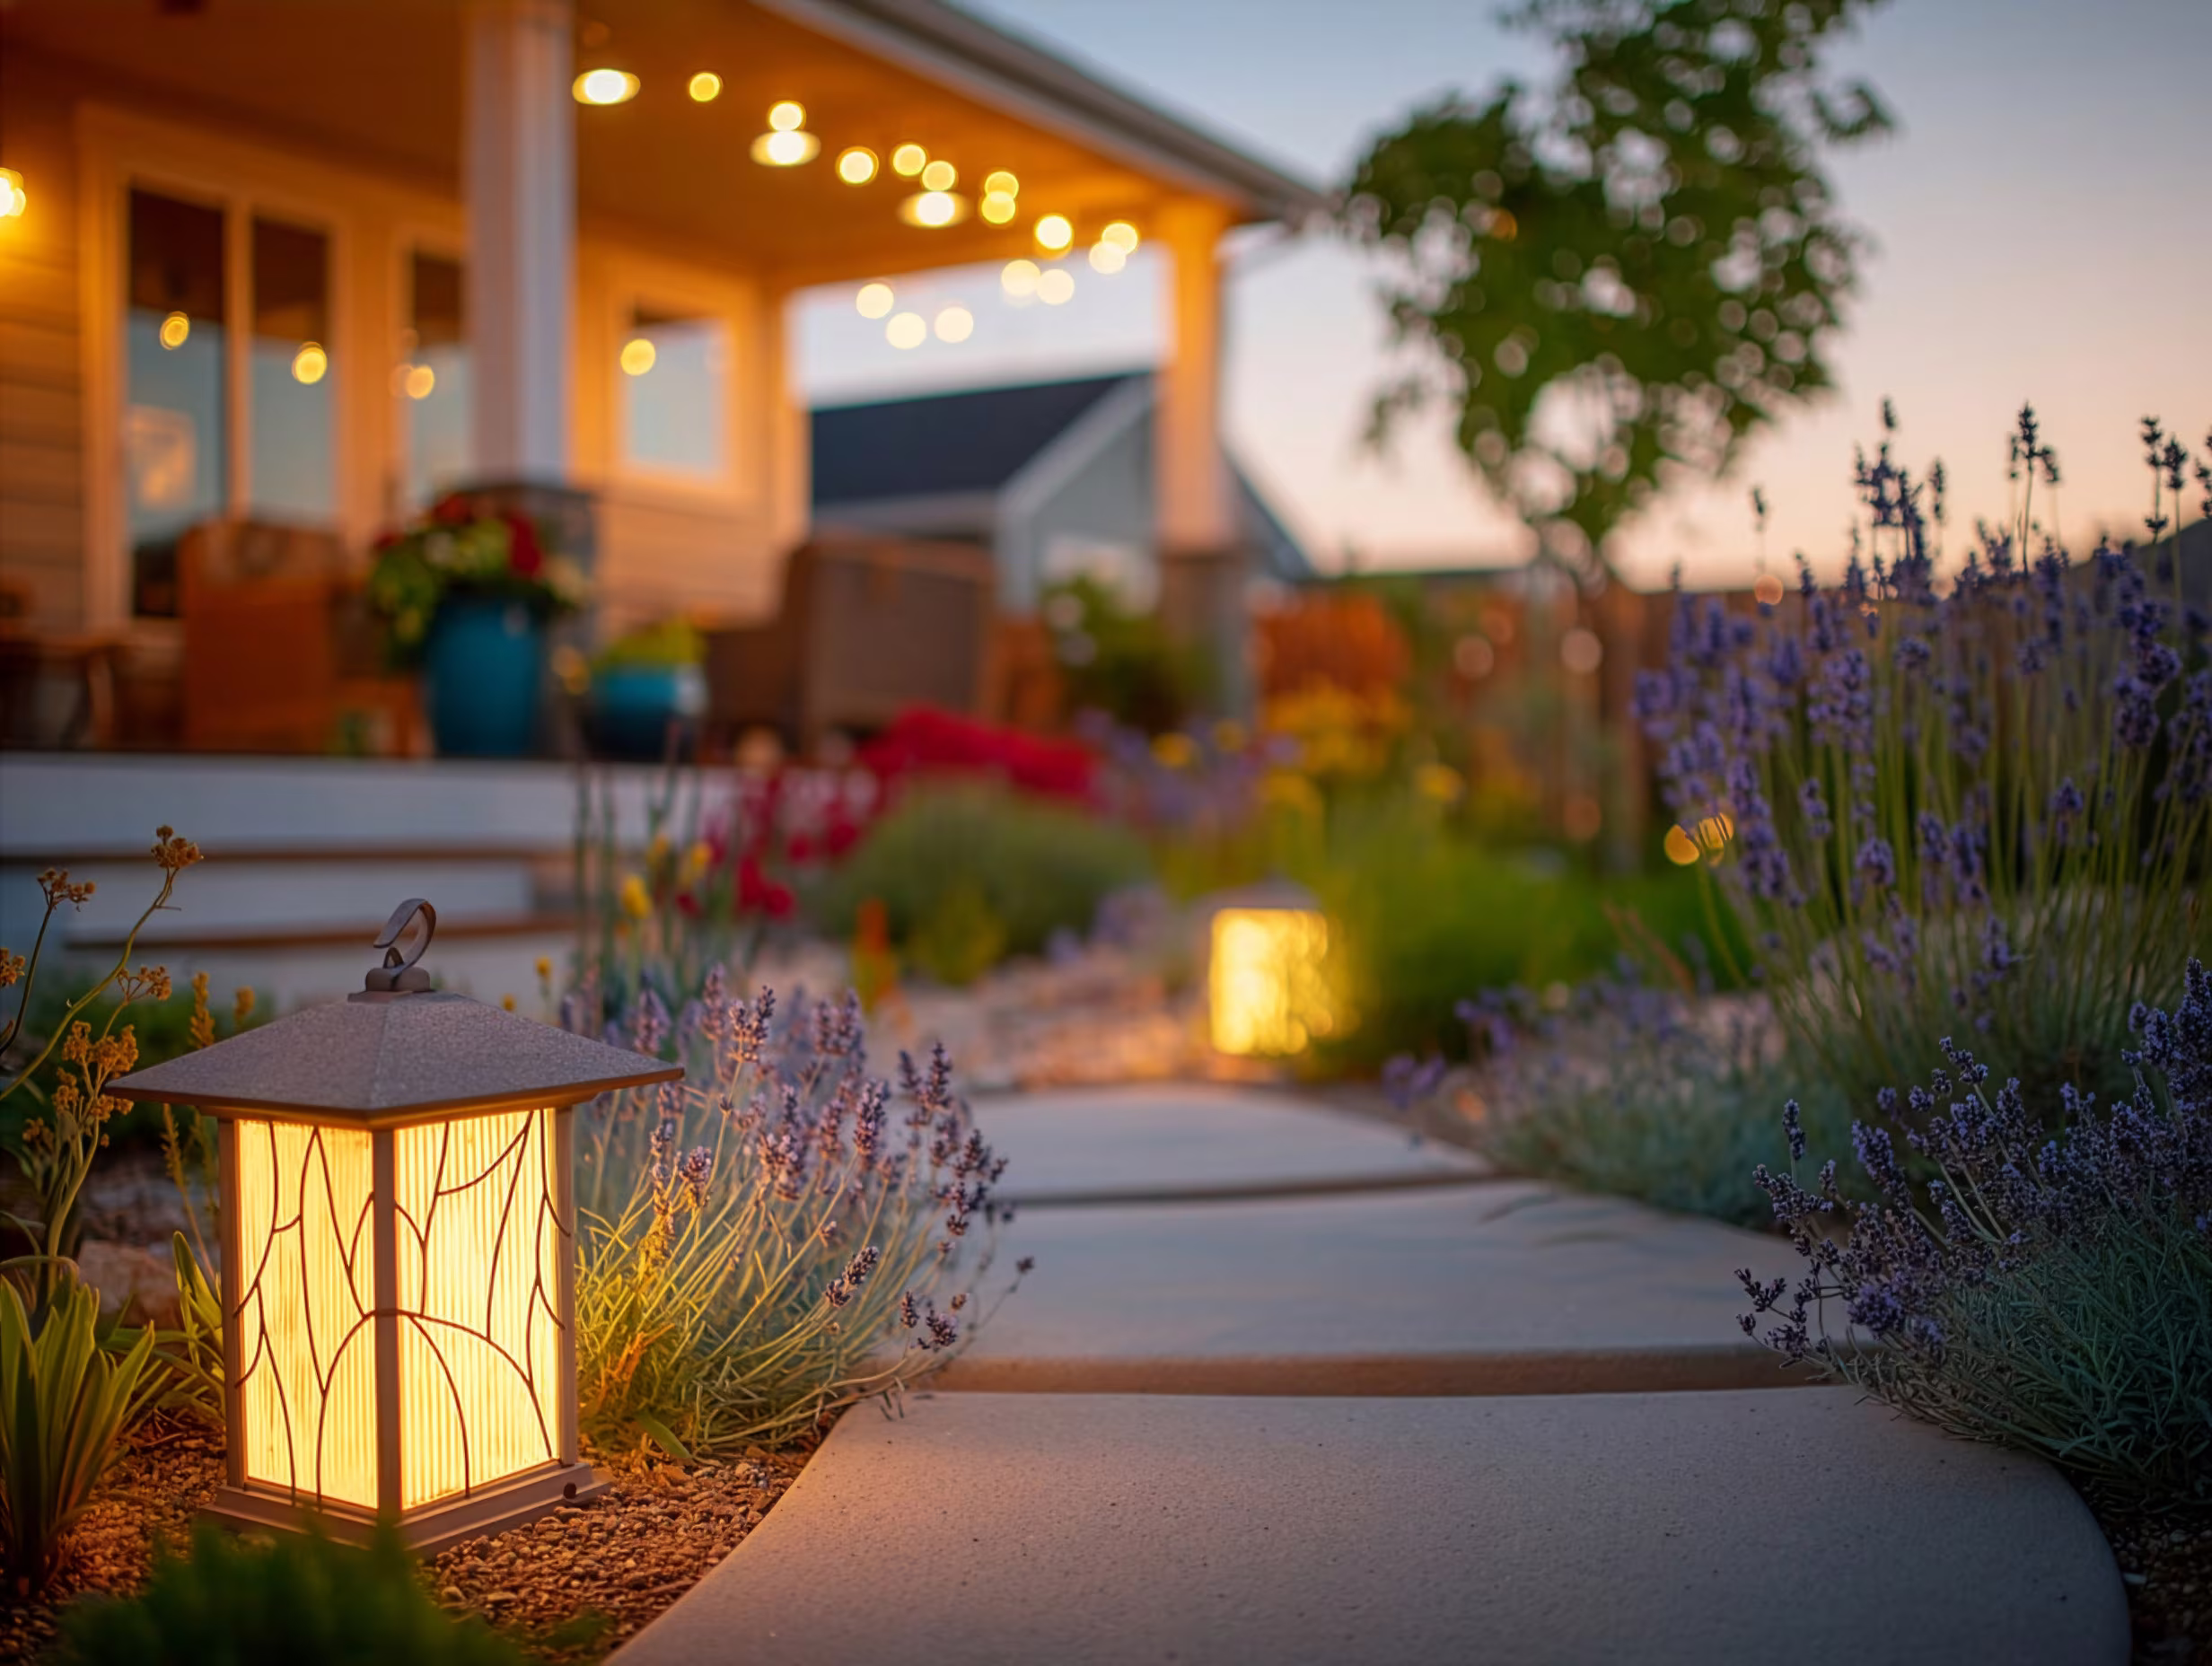
String lights are the fastest, most affordable way to transform a patio or outdoor dining area into a destination. Draped between posts, trees, or a pergola, they create the warm overhead canopy that makes outdoor spaces feel intimate and inviting. In Southern California, where year-round outdoor entertaining is a lifestyle rather than a seasonal event, string lights often become the most-used element of any lighting plan.
The key to string lights that look intentional rather than haphazard is a support cable. Run galvanized steel cable between your anchor points first, then drape the lights along it. This prevents sagging, adds wind resistance for Santa Ana events, and makes seasonal bulb replacement simple.
Security and Flood Lighting
Security lighting serves a practical purpose, but it does not have to look industrial. Modern LED flood lights with adjustable brightness and warm color temperatures (3000K) provide safety without the prison-yard aesthetic. Motion-activated fixtures at entry points and along side yards deter unwanted visitors while keeping your landscape lighting ambiance intact.
The most effective security approach uses landscape lighting itself as a deterrent. A well-lit front yard with pathway lights and accent lighting signals that the home is occupied and cared for. Security professionals consistently note that consistent exterior lighting is one of the most effective ways to discourage unwanted activity around a property.
GOOD TO KNOW
The color temperature of your bulbs affects both mood and visibility. For landscape lighting that feels warm and inviting, choose LEDs in the 2700K to 3000K range. Reserve cooler temperatures (4000K and above) for security applications only. Mixing warm and cool bulbs in the same sightline creates a jarring, inconsistent look that undermines the design.
Quick Comparison: Types of Landscape Lighting
| Type | Best Use | Height | Beam | Mood | DIY Level |
|---|---|---|---|---|---|
| Path Lights | Walkways, borders, driveways | 14-24 inches | Wide, downward | Guiding, safe | Easy |
| Uplighting | Trees, sculpture, architecture | Ground level | Narrow to medium, upward | Dramatic, artistic | Moderate |
| Downlighting | Canopy areas, patios, seating | 15-20 feet | Wide, downward | Natural, gentle | Professional |
| String Lights | Patios, dining areas, pergolas | 8-12 feet | Ambient, omnidirectional | Social, warm | Easy |
| Spotlighting | Focal features, art, entries | Ground or mounted | Narrow, directional | Highlighting | Moderate |
| Flood / Security | Side yards, entries, dark corners | 8-15 feet | Very wide | Functional, safe | Easy |
How Do You Light a Drought-Tolerant Yard for Maximum Impact?
This is the landscape lighting opportunity that no one is talking about. Every lighting guide on the internet assumes your yard has a lawn, trimmed hedges, and a row of boxwoods along the front walk. But if you have already made the shift to a water-wise landscape, or you are planning to, your yard has something far more interesting to light.
Drought-tolerant plants have bold, sculptural forms that traditional landscape plants simply do not offer. Agave rosettes. Twisting manzanita branches. Feathery deer grass that catches the slightest breeze. Rock features and dry creek beds that add texture without a single living leaf. These elements are not lighting challenges. They are lighting advantages.
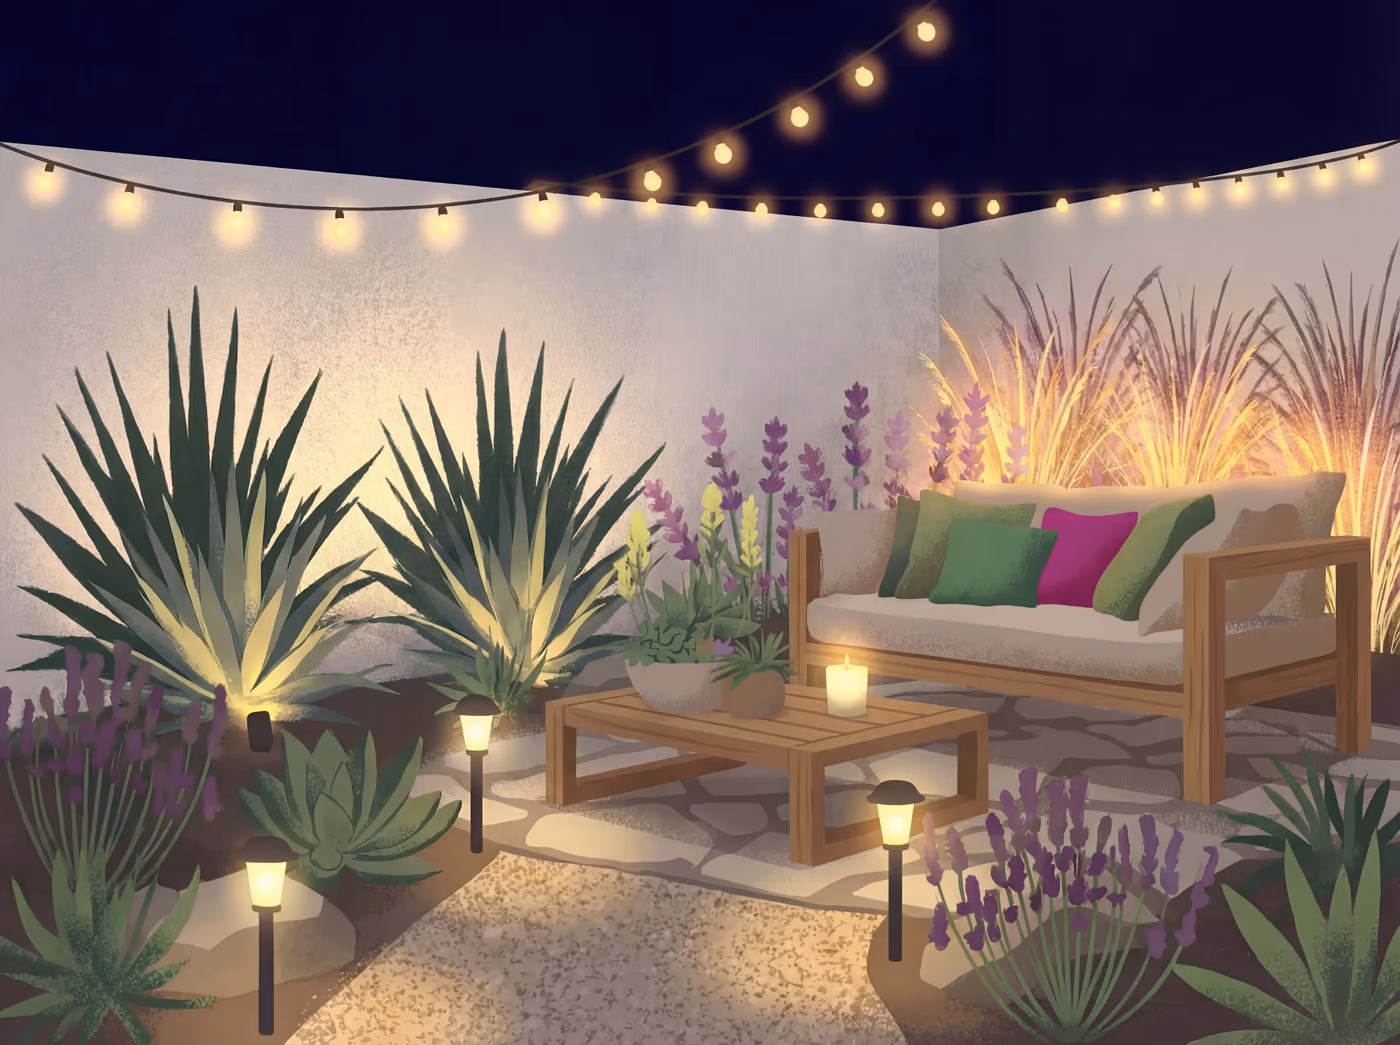
Uplighting Native Plants and Succulents
The secret to lighting native and drought-tolerant gardens is to think in silhouettes and textures rather than simply illuminating everything evenly. Each plant form suggests a different technique:
Agave and aloe: Position a single spotlight behind the plant, aimed slightly upward. The thick, architectural leaves create bold silhouettes against a wall, fence, or gravel background. The shadow of a large agave can be even more striking than the plant itself.
Manzanita and toyon: Uplighting from the base reveals the dramatic branching structure and peeling bark that make these California natives so distinctive. Place the fixture 12 to 18 inches from the trunk and aim upward into the canopy. The interplay of light and shadow through the branches creates a layered effect that changes subtly with even a light breeze.
Ornamental grasses (deer grass, purple needle grass, muhly grass): Backlighting is the technique here. Position the light behind the grass so the beam passes through the blades, creating a translucent, golden glow. This works especially well at sunset transition when artificial backlighting picks up where natural light leaves off.
California poppies and wildflower meadows: Low-angle wash lighting at ground level illuminates flower beds without overpowering them. Spread-type fixtures placed at the edge of a wildflower area cast a gentle carpet of light across the blooms.
California oaks: Moonlighting from within the canopy is the ideal technique for mature oaks. Mount two to three fixtures high in the branches, aimed downward. The thick, sculptural limbs create shadow patterns on the ground that feel ancient and natural.
PRO TIP
When lighting succulents and cacti, use a color temperature of 2700K (warm white). Cooler temperatures wash out the blue-green and silver tones that make these plants visually distinctive. Warm light enhances the natural color palette of drought-tolerant gardens and creates a cohesive look with the gravel, stone, and decomposed granite surfaces around them.
Lighting Gravel, Decomposed Granite, and Hardscape Pathways
Water-wise yards often feature ground surfaces that interact with light differently than turf or dark mulch. Decomposed granite, pea gravel, and flagstone all have higher reflectivity than organic ground cover, which means your path lights produce a wider, softer pool of illumination. This is an advantage: you can space fixtures further apart (eight to ten feet instead of six to eight) and still achieve even coverage along a walkway.
Dry creek beds are another water-wise feature that transforms under lighting. A line of low-profile, ground-level fixtures along the edge of a dry creek bed creates the illusion of flowing water at night, especially when the light catches polished river rock and smooth boulders.
Rock Features and Boulder Arrangements
Rock is one of the most rewarding landscape elements to light. A single accent light aimed at a large boulder or rock arrangement creates shadows and highlights that give the feature depth and presence it lacks during the day. Position the light to graze across the rock surface at a steep angle, which emphasizes every crack, color variation, and lichen patch.
For rock walls and retaining walls, grazing light placed 12 inches from the base and aimed upward along the face reveals the full texture of the stone. This technique works equally well on stacked flagstone, natural boulder walls, and manufactured stone veneer.
GOOD TO KNOW
If you have recently removed your lawn or are planning a water-wise conversion, consider your lighting plan as part of the landscape design rather than an afterthought. Running low-voltage wire before new gravel, DG, or plantings are installed is significantly easier than trenching through finished hardscape. Your landscape contractor can include wire routing in the same phase as irrigation installation.
What Are the Best Outdoor Lighting Ideas for Every Part of Your Yard?
A well-designed landscape lighting plan addresses the entire property, not just the backyard. Each zone has different needs and different opportunities. Here are specific outdoor lighting ideas organized by location, with techniques that work particularly well for Southern California yards.
Front Yard and Curb Appeal
The front yard is where landscape lighting makes its first impression. A combination of path lights along the front walkway, accent lights on one or two focal trees or plantings, and soft illumination near the entry creates a welcoming approach that also signals a cared-for property.
For drought-tolerant front yards, the lighting plan doubles as a design showcase. Uplighted agave, illuminated rock features, and path-lit DG walkways demonstrate that a water-wise yard is not a sacrifice. It is a statement. Position one accent light on the most architecturally interesting plant in your front garden and let it anchor the entire nighttime composition.
Backyard Patio and Entertaining Spaces
The patio is where lighting transitions from functional to emotional. Layer three types: string lights or downlighting overhead for ambient warmth, table-level candles or lanterns for intimate dining, and surrounding accent lights on nearby plantings for depth. This three-layer approach creates the sense of an outdoor room with a defined ceiling, walls of soft garden light, and a comfortable center.
Color temperature consistency matters most in social spaces. Keep every light source in the 2700K range for a cohesive, warm glow. A single cool-white security light visible from the patio shatters the ambiance that three other light sources worked to create.
For Southern California homeowners who entertain year-round, investing in dimmable or smart-controlled patio lighting pays dividends. Lower the lights for a relaxed at-home date night or bring them up for a backyard game tournament. That flexibility turns one space into many moods.
Garden Beds and Planting Areas
Garden lighting is about revealing what you have planted without overwhelming it. The goal is to create pockets of interest rather than flooding the entire bed with light. Choose two or three standout plants or features within each garden area and light those, letting the surrounding plants recede into soft shadow. This contrast is what gives garden lighting its depth and drama.
For edible gardens and herb beds, low-profile ground lights along the border serve a practical purpose: you can see what you are harvesting during evening meal prep. There is something deeply satisfying about walking outside at dusk to snip fresh rosemary for tonight's dinner under a gentle wash of warm light.
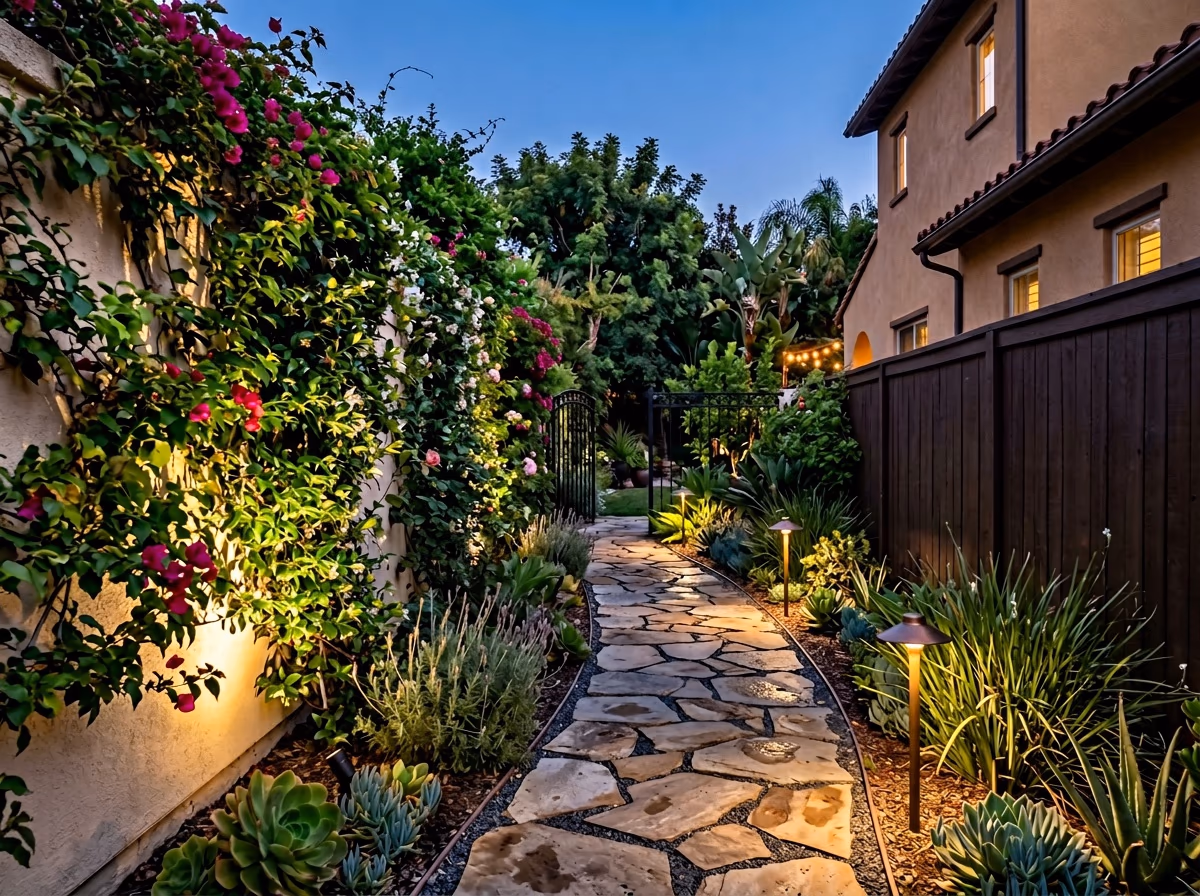
Side Yards and Transition Spaces
Side yards are the most neglected zones in residential lighting design, and often the ones that benefit most from it. A narrow side yard with nothing more than two or three evenly spaced path lights and a single uplight on a vine-covered wall transforms from a forgotten utility corridor into a usable garden passage. In Southern California homes where side yards connect the front entry to the backyard, this lighting creates a sense of journey and arrival that elevates the entire property.
Landscape Lighting Ideas for the Front of the House
Beyond the walkway, consider lighting that interacts with the home's architecture. Wall-wash fixtures aimed at textured stucco or stone facades create a warm glow that extends the visual mass of the house into the landscape. Soffit-mounted downlights under eaves illuminate foundation plantings without visible fixtures. And a pair of accent lights flanking the garage or front columns frames the entryway with symmetry and intention.
Modern landscape lighting trends favor clean, integrated fixtures that disappear during the day. Recessed step lights, flush-mounted deck lights, and micro-spotlights concealed in garden beds keep the focus on the light itself rather than the hardware.
GOOD TO KNOW
Landscape lighting increases home value. Industry research suggests that well-designed outdoor lighting delivers strong cost recovery in added property value. Beyond the financial return, real estate professionals consistently note that homes with landscape lighting sell faster because they make a stronger first impression during evening showings.
Should You Choose Solar or Low-Voltage Landscape Lighting in Southern California?
This is one of the most common questions homeowners face, and living in Southern California changes the answer compared to what you will read in national guides. Our climate gives solar technology a genuine advantage that homeowners in cloudier regions do not share, but low-voltage systems still win in specific applications. The right answer for your yard might be both.
Solar Landscape Lighting: The Southern California Advantage
Southern California receives more than 280 sunny days per year, which means solar panels charge efficiently nearly every day. Modern solar landscape lights use lithium-ion batteries that store enough energy for six to ten hours of illumination on a full charge, and even partial sun days in our climate produce enough charge for a full evening of light.
Solar is the best choice when:
The main limitation of solar is brightness consistency. Solar fixtures dim as the battery depletes through the evening, and their maximum output is lower than comparable low-voltage fixtures. For path lighting and accent lighting where soft glow is the goal, this is perfectly acceptable. For dramatic uplighting or long-throw spotlighting, low-voltage is the better tool.
Low-Voltage (12V) Landscape Lighting: Precision and Power
Low-voltage systems run on 12 volts of power delivered through a transformer that plugs into a standard outdoor outlet. The transformer steps household 120V current down to a safe 12V that most homeowners can install with basic tools. Low-voltage fixtures produce brighter, more consistent light than solar equivalents, and they maintain that brightness throughout the evening.
Low-voltage is the best choice when:
The Hybrid Approach: Best of Both
Many Southern California homeowners find that combining both technologies produces the best result. Solar path lights along walkways and garden borders handle the functional layer with zero wiring. Low-voltage accent lights on key trees and architectural features deliver the drama. String lights on the patio cover the ambient layer. Each technology plays to its strength.
PRO TIP
When placing solar fixtures, position the integrated solar panel or separate panel unit where it receives at least six hours of direct sun. In Southern California, south-facing placement maximizes winter performance when days are shorter. Avoid placing solar path lights under tree canopy or on the north side of walls and fences where shadow falls during peak charging hours.
Solar vs. Low-Voltage: Quick Decision Guide
| Factor | Solar | Low-Voltage |
|---|---|---|
| Installation | Stake and place, no wiring | Wire routing, transformer needed |
| Ongoing cost | $0 (no electricity) | $1–3/month typical |
| Brightness | Moderate, dims through evening | Consistent, high output available |
| Best for | Paths, borders, accents | Uplighting, spotlights, large systems |
| Smart control | Limited (some app-enabled) | Full (timers, dimmers, WiFi) |
| SoCal advantage | High (280+ sunny days) | No freeze-thaw for buried wire |
| Upfront cost | $15–50 per fixture | $30–100 per fixture + transformer |
| Lifespan | 2–4 years (battery replacement) | 10–20 years (LED, quality fixtures) |
How Do You Design a Landscape Lighting Layout That Actually Works?
The difference between landscape lighting that feels like a resort and landscape lighting that feels like a used car lot comes down to design, not budget. A few well-placed fixtures with intentional beam angles outperform 30 random lights scattered across a yard every time. Here are the principles that professional lighting designers follow.
Start With Focal Points, Not Coverage
Walk your yard at night with a strong flashlight or work light. Aim it at different features: a tree, a rock formation, the wall at the back of the patio, a sculptural plant. Notice what looks interesting when lit and what looks flat. The features that come alive under directional light are your focal points. Everything else gets supporting light or stays in shadow.
Most residential yards need three to five focal points. Trying to highlight everything highlights nothing.
"Just start, make that first mark and start generating ideas. Write down what you’re thinking, and if you ever get brain fog or designer’s block, you can always revisit and refine."
— Jonathan Stalvey, Design Principal, TerraWorks Studio
Layer Light at Three Heights
Effective lighting exists at multiple levels. Ground-level path lights and accent lights form the base layer. Mid-level string lights, wall-mounted fixtures, and garden lanterns create the middle layer. High-mounted downlights and moonlighting form the canopy layer. When all three layers work together, the yard feels three-dimensional and immersive.
If you can only afford one layer, start with ground-level path and accent lighting. It provides safety and visual interest. Add the middle layer next for social and entertaining spaces. Save the canopy layer for mature trees and established gardens where the investment has the greatest impact.
Use Shadow as a Design Element
Beginners tend to eliminate all shadows. Professionals use shadow as carefully as they use light. The interplay of bright and dark is what gives a landscape depth and mystery at night. A garden lit entirely to the same brightness looks artificial and flat. A garden with pools of light separated by soft darkness feels inviting and alive.
Leave deliberate dark zones between lit areas. These transitions guide the eye from one focal point to the next and create the sense of discovery that makes an evening walk through your garden feel like an experience rather than a commute.
Plan for How You Move Through the Space
Lighting should follow the natural paths of movement through your yard. From the front entry to the front door. From the back door to the patio. From the patio to the garden or fire feature. Each transition should feel guided but not dictated: gentle pools of path light that suggest direction without creating a runway.
PRO TIP
Before buying any fixtures, do a nighttime walkthrough with clip-on work lights or even mason jars with battery candles placed at proposed locations. Live with the arrangement for two or three evenings, adjusting positions until the flow feels natural. This ten-dollar experiment prevents hundred-dollar mistakes.
Respect Your Neighbors and the Night Sky
Dark Sky compliance is increasingly important in Southern California communities. Well-designed landscape lighting directs all illumination downward and inward, keeping light on your property and out of neighboring windows and the sky above. Shielded fixtures, appropriate brightness levels, and thoughtful placement are not just courteous. They are the difference between lighting that enhances your neighborhood and lighting that annoys it.
How Do You Build a Landscape Lighting Plan on a Phased Budget?
You do not need to light your entire yard at once. In fact, a phased approach often produces better results because you live with each layer before adding the next, learning what your yard needs rather than guessing all at once. Here is a practical phased plan that builds a complete lighting system over time.
Phase 1: Safety and Pathways ($200 to $400)
Install path lights along your primary walkways: front entry to door, back door to patio, and any steps or grade changes. This phase is the foundation. It addresses safety, adds immediate curb appeal, and establishes the ground layer of your lighting design. Solar path lights keep this phase simple and wire-free.
Phase 2: Focal Point Accents ($300 to $600)
Add two to four accent lights to highlight your best landscape features. One uplight on a specimen tree. A pair of spotlights on the front entry. A grazing light on a textured rock wall or fence. This phase transforms the yard from safely lit to artfully lit. Low-voltage fixtures provide the beam control and brightness this phase requires.
Phase 3: Entertaining and Ambiance ($200 to $500)
Install outdoor string lights over the patio or primary social area. Add landscape lighting around the dining or seating zone to create a sense of enclosure. This phase unlocks the full evening entertaining potential of your yard and is where the "outdoor room" concept becomes reality in your Yardtopia.
Phase 4: Smart Controls and Refinement ($150 to $400)
Add a timer, photocell, or smart controller to automate your system. Fine-tune fixture positions based on what you have learned from living with Phases 1 through 3. Replace any fixtures that are too bright or too dim. Add one or two supplemental lights to fill in gaps you have discovered. This phase polishes the system into something that feels effortless and complete.
GOOD TO KNOW
If you plan to use low-voltage lighting in later phases, run wire during Phase 1 even if you are only installing solar path lights initially. Burying conduit or direct-burial cable while pathways are being installed or before new gravel and plantings go in saves significant time and disruption later. A landscape contractor can include wire routing in the same phase as pathway lights installation.
Phased Budget Overview
| Phase | What You Get | Estimated Cost | Cumulative Effect |
|---|---|---|---|
| 1: Pathways | Safe, welcoming navigation | $200–$400 | Your yard is usable at night |
| 2: Accents | Drama, curb appeal, focal points | $300–$600 | Your yard has visual interest |
| 3: Ambiance | Entertaining zones, social warmth | $200–$500 | Your yard feels like an outdoor room |
| 4: Controls | Automation, polish, refinement | $150–$400 | Your yard runs itself beautifully |
| Total | Complete landscape lighting | $850–$1,900 | A fully designed lighting system |
Compare that range to a single professional installation, which typically runs $3,000 to $8,000 for a full residential system. The phased DIY approach delivers comparable results at a fraction of the cost, spread over months rather than demanded all at once.
What Maintenance Does Landscape Lighting Need in Southern California?
One of the genuine advantages of modern LED landscape lighting is how little maintenance it requires. LED fixtures have no bulbs to replace on a regular schedule (most are rated for 25,000 to 50,000 hours of use), no filaments to burn out, and no ballasts to fail. A well-installed system in Southern California's mild climate can run for years with only seasonal attention.
Monthly: A Five-Minute Walk
Once a month, walk your lighting route after dark. Check that all fixtures are illuminated, none have shifted position from foot traffic or irrigation, and no plants have grown to block a beam. This five-minute habit catches small issues before they become invisible problems that degrade your lighting design slowly over time.
Quarterly: Clean and Adjust
Wipe fixture lenses with a damp cloth. Southern California's dry climate produces a fine layer of dust that accumulates on lenses and reduces output by 10 to 20 percent over a few months. Check for spider webs inside and around fixtures, which are common in our climate. Trim any plant growth that has started to block or redirect a beam.
Annually: System Check
Test your transformer output with a multimeter to verify it is delivering the correct voltage. Inspect all wire connections for corrosion or loosening, especially at splice points. Check solar panels on solar-powered fixtures and clean them with a damp cloth. Replace any solar fixture batteries that no longer hold a charge through the evening (typically every two to three years).
Santa Ana Wind Season: Before and After
Before Santa Ana winds, check that string lights are secured to their support cable and that tall fixture stakes are firmly seated. After a windy day, walk the system to check for shifted or knocked-over fixtures, debris accumulation, and any fixtures that may have been hit by falling branches.
EXPERT TIP
UV degradation is the primary enemy of landscape lighting fixtures in Southern California. Over years, plastic lenses can yellow and crack from sustained sun exposure. When selecting fixtures, look for glass lenses and brass, copper, or powder-coated aluminum housings. These materials hold up significantly better in our high-UV environment than plastic or painted steel alternatives.
Frequently Asked Questions
How much does landscape lighting cost?
A basic DIY path lighting system using solar fixtures costs $200 to $400 for materials. A more comprehensive low-voltage system with path lights, accent lights, and a transformer typically runs $800 to $2,000 for a DIY installation covering a typical residential yard. Professional landscape lighting installation in the Orange County area ranges from $3,000 to $8,000 or more depending on the number of fixtures, system complexity, and site conditions.
Can I install landscape lighting myself?
Low-voltage (12V) landscape lighting is designed for homeowner installation. The transformer plugs into a standard outdoor GFCI outlet, and the fixture wire buries below grade. Solar landscape lighting is even simpler: stake the fixtures into the ground and position the solar panels in sun. If you need a new outdoor GFCI outlet installed, that step involves your home's 120-volt system and is best handled by a licensed electrician. Check with your local building department for any specific requirements in your area.
What is the best color temperature for outdoor landscape lighting?
Warm white in the 2700K to 3000K range produces the most natural, inviting glow for landscape applications. This temperature range mimics the quality of candlelight and early sunset, creating ambiance that encourages relaxation and social connection. Reserve cooler temperatures (4000K and above) strictly for security applications. Mixing warm and cool fixtures in the same visible area creates an inconsistent, jarring appearance.
How many lumens do I need for landscape lighting?
Path lights typically need 50 to 200 lumens per fixture. Accent and uplighting for small to medium plants works well at 200 to 400 lumens. Large tree uplighting requires 400 to 800 lumens or more depending on the height and canopy size. Security and flood lighting ranges from 700 to 1,500 lumens. More lumens is not always better; overlighting is the most common DIY mistake, creating a harsh look that defeats the purpose of landscape lighting.
Do solar landscape lights work well in Southern California?
Solar landscape lights perform exceptionally well in Southern California due to getting 280+ sunny days per year. Modern solar fixtures charge efficiently even on partly cloudy days and provide six to ten hours of illumination on a full charge. The main consideration is panel placement: position the solar panel where it receives at least six hours of direct sun, avoiding north-facing walls and dense tree canopy. Solar works best for path lights and low-output accent lighting; high-output uplighting and spotlighting still favor low-voltage systems.
How far apart should landscape path lights be?
Space path lights six to eight feet apart on alternating sides of the walkway for the most natural effect. This creates overlapping pools of light without gaps or excessive brightness. For wider paths (four feet or more), increase spacing to eight to ten feet. For narrow garden paths, four to six feet may work better. The goal is comfortable visibility without the runway effect of evenly spaced, same-side fixtures.
How do you light a yard without an outdoor electrical outlet?
Solar landscape lighting eliminates the need for electrical outlets entirely. For more permanent installations, a low-voltage transformer can be plugged into an indoor outlet near a window or door, with the wire routed outside through a small gap or dedicated pass-through. Adding a dedicated outdoor GFCI outlet is a relatively simple electrical project (typically $150 to $300 from a licensed electrician) that opens up the full range of low-voltage and smart lighting options.
The Bottom Line
Landscape lighting is not a finishing touch. It is the feature that doubles the hours you spend enjoying your outdoor space, adds safety and security, increases your property's value, and transforms your yard from a daytime-only asset into a year-round evening destination. In Southern California, where the climate hands you 280+ evenings of perfect outdoor weather every year, leaving your yard dark after sunset means leaving half of your outdoor living potential on the table.
Start where it matters most to you. If safety is the priority, begin with pathway lighting this weekend. If ambiance is the goal, string lights over the patio deliver instant transformation. If drama and curb appeal drive you, a single uplight on your most striking tree or plant feature changes the entire nighttime character of your property.
You do not need to do it all at once. The phased approach described in this guide builds a complete, professional-quality lighting system over time, at a pace that fits your budget and your lifestyle. Each phase stands on its own while setting up the next.
Ready to get started? Browse lighting ideas, water-wise landscaping inspiration, and design tools at Yardtopia.com to begin building the evening version of your Yardtopia. The yard you love during the day is waiting to show you what it can do after dark.