Landscape lighting can be the key to tie your Yardtopia design together. Whether you are lighting a water-wise front yard you just transformed or adding ambiance to a backyard patio, the process is the same: plan thoughtfully, install confidently, and enjoy the results every evening of the year.
KEY TAKEAWAYS
- Low voltage landscape lighting runs on a safe 12-volt system that most homeowners can install in a single weekend using basic tools. The fixtures, wire, and transformer are designed for homeowner installation.
- A well-planned lighting layout starts with safety and function (pathways, steps, entries) and builds toward ambiance and beauty, so you can phase the project across weekends and budgets without reworking what you already installed.
- Southern California's drought-tolerant landscapes — with their sculptural succulents, textured gravel, and architectural native plants — actually create more dramatic lighting effects than traditional lawns, turning your water-wise yard into something stunning after sunset.
Why Does Low Voltage Landscape Lighting Change Everything About Your Evenings Outside?
Switching to low voltage landscape lighting delivers a full transformation, and the part that surprises most people is how accessible the project actually is. Low voltage systems run on 12 volts (the same as a car battery), which means the wiring is safe to handle, the connections are simple, and the entire installation requires no permits and no electrician for the outdoor portion. A transformer plugged into a standard outdoor outlet steps your household power down to 12 volts, and from there you run wire, connect fixtures, and adjust until the effect feels right.
This guide walks through every step of planning, installing, and fine-tuning a low voltage landscape lighting system designed for Southern California yards. Whether you are lighting a water-wise front yard you just transformed or adding ambiance to a backyard patio, the process is the same: plan thoughtfully, install confidently, and enjoy the results every evening of the year.
What Makes Low Voltage the Right Choice for DIY Landscape Lighting?
Low voltage landscape lighting uses a 12-volt system instead of your home's standard 120-volt line power. That single difference is what makes the entire project accessible to homeowners. Here is why it matters.
Safety comes first. A 12-volt system carries so little electrical charge that accidental contact with a bare wire will not cause a shock. You can cut, splice, and connect landscape lighting wire without shutting off power to the system. For anyone who has hesitated to take on an electrical project, low voltage removes the barrier entirely.
Accessible for homeowners. The transformer plugs into an existing outdoor GFCI outlet, which is the only connection to your home's electrical system. Everything downstream of the transformer --- the wire, the connectors, the fixtures --- operates at 12 volts, and most homeowners can handle the installation with basic tools. If you do not have an outdoor GFCI outlet near your transformer location, that outlet installation involves your home's 120-volt system and is best handled by a licensed electrician. Check with your local building department for any requirements specific to your area.
Energy efficiency that adds up. Modern LED low voltage fixtures use 75 to 80 percent less energy than older halogen systems. A typical 10-fixture LED setup draws fewer watts than a single 100-watt incandescent bulb. Your landscape can glow beautifully every night of the year without meaningfully affecting your electricity bill.
Flexibility to expand over time. A low voltage system is designed to grow with your vision. Start with pathway lights this weekend, add uplighting on the trees next month, and install accent lights around the patio when the budget allows. The transformer, wire, and connection method stay the same across every phase.
GOOD TO KNOW
The term "low voltage" specifically means 12-volt systems (sometimes called 12v landscape lighting). You may also see "line voltage" outdoor lighting, which runs on 120 volts and requires a licensed electrician for installation. For DIY landscape lighting, low voltage is the standard, and virtually every landscape lighting kit sold at home improvement stores uses this 12-volt system.
How Do You Plan a Landscape Lighting Layout Before You Buy Anything?
The best landscape lighting installations start on paper, not at the store. Spending 30 minutes sketching your yard and identifying what you want to light prevents the two most common DIY mistakes: buying too many fixtures and placing them without a clear purpose.
Step 1: Walk Your Yard at Night
Before you plan anything, walk your property after dark with a bright flashlight. Hold the light at different angles against trees, along walkways, and toward architectural features. You will immediately see which plants cast interesting shadows, which paths feel uncertain without light, and which areas of your yard have the most potential for dramatic effect. This ten-minute exercise reveals more about your lighting needs than any planning guide.
Step 2: Sketch Your Property and Mark Three Zones
Grab a piece of paper and draw a rough overhead view of your yard. It does not need to be precise. Mark the house, pathways, driveway, patio, trees, planting beds, and any hardscape features. Then identify three zones:
Safety zone: Paths, steps, transitions between surfaces, entry points, and anywhere a guest might trip or feel uncertain at night. These get lit first, always.
Feature zone: Trees, large plants, architectural elements, water features, and garden focal points that deserve attention. Uplighting, downlighting, and accent lighting live here.
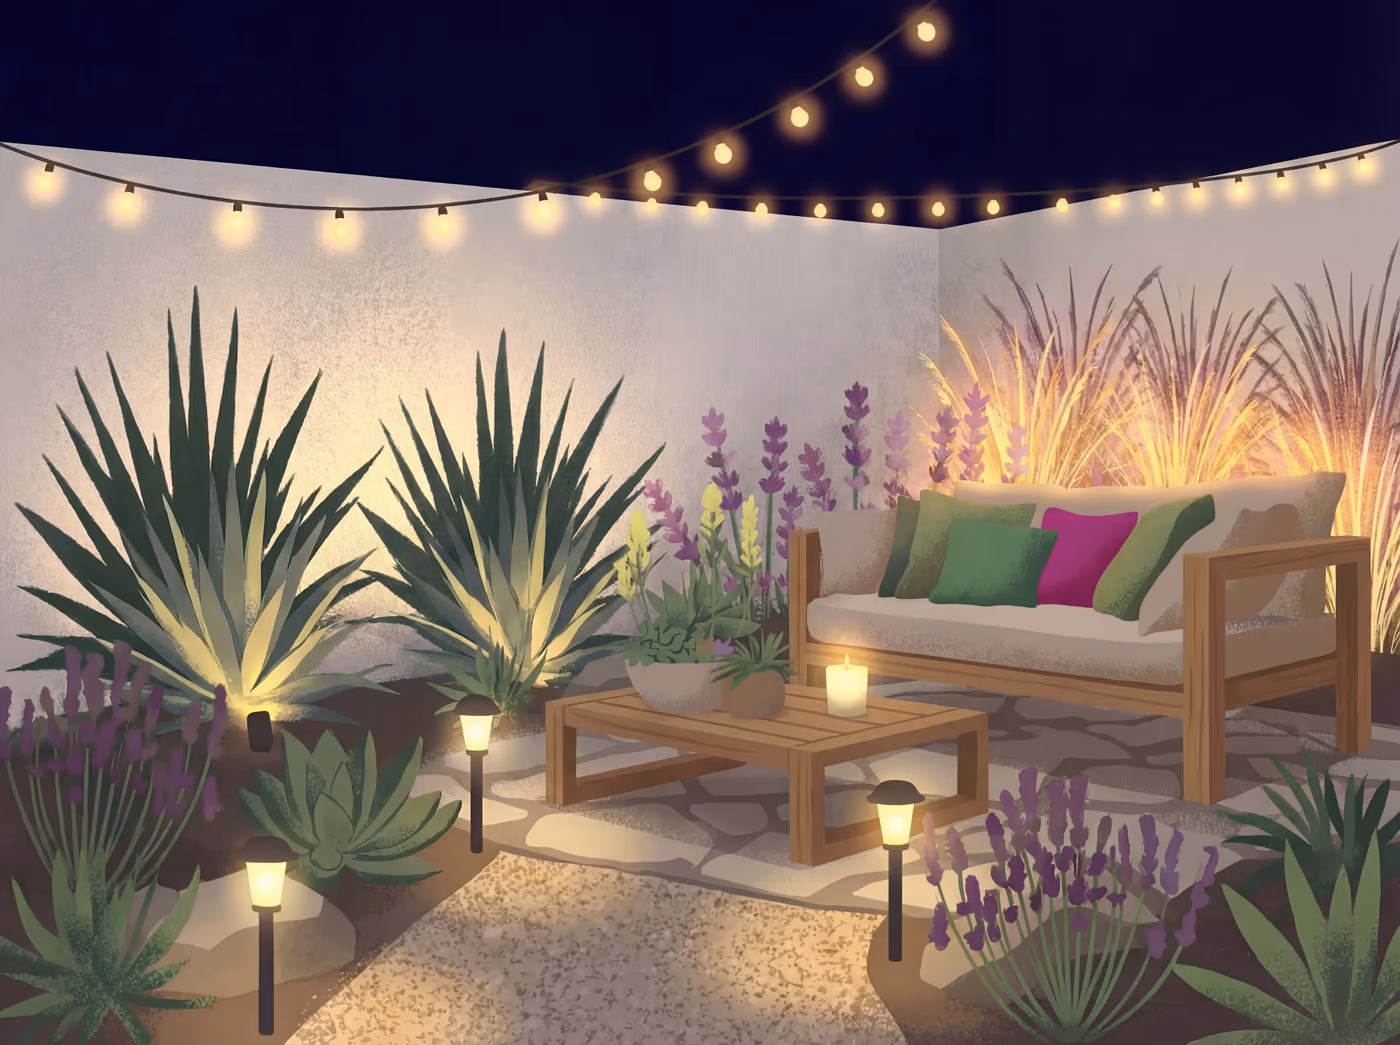
Ambiance zone: The patio, dining area, seating nooks, and gathering spaces where mood matters more than visibility. This is where your Yardtopia truly comes to life after dark.
Step 3: Count Fixtures and Estimate Wattage
Once your zones are marked, count the number of fixtures you need. A typical residential installation uses 8 to 15 fixtures, though larger properties may use more. For each fixture, note the estimated wattage (most LED path lights draw 2 to 4 watts; LED spotlights draw 4 to 8 watts). Add up the total wattage across all fixtures. This number determines your transformer size.
PRO TIP
Resist the urge to light everything. The most effective landscape lighting designs use contrast between light and shadow. If every corner of your yard is illuminated, the effect flattens out and nothing feels special. Professional lighting designers follow a simple rule: light what you want people to notice, and let the rest fall into comfortable darkness. Three well-placed fixtures often create more impact than ten scattered randomly.
How Do You Choose the Right Landscape Lighting Transformer?
The transformer is the heart of your low voltage system. It plugs into your outdoor GFCI outlet, converts 120-volt household power down to 12 volts, and distributes that power to every fixture on the circuit. Choosing the right size is essential: too small and your lights dim or flicker; too large and you overspend on capacity you will never use.
Sizing Your Transformer: The 80 Percent Rule
Add up the total wattage of every fixture in your system. Then choose a transformer rated for at least 25 percent more than that total. This is called the 80 percent rule: your fixtures should use no more than 80 percent of the transformer's rated capacity.
Example calculation:
Most residential LED installations fall in the 100 to 300-watt transformer range, even with 15 to 20 fixtures. The efficiency of LED technology means you rarely need the 600-watt transformers that older halogen systems required.

Features Worth Having
Built-in timer or photocell: Automates your lights so they turn on at dusk and off at a set time. Photocells respond to actual light levels; timers follow a programmed schedule. Many modern transformers include both.
Multi-tap terminals (12V, 13V, 14V, 15V): These compensate for voltage drop over long wire runs. If your farthest fixture is more than 50 feet from the transformer, connecting to a higher tap ensures consistent brightness. More on voltage drop in the wiring section below.
Weatherproof housing: Your transformer lives outdoors. Look for units rated for outdoor installation with sealed enclosures. Mount it at least 12 inches above grade to keep it clear of irrigation splash and mulch.
GOOD TO KNOW
If your yard does not have an outdoor GFCI outlet near where you want to mount the transformer, hiring a licensed electrician to install one is the smartest investment in the project. A single outdoor outlet installation typically runs.
How Do You Wire and Install Low Voltage Landscape Lighting Step by Step?
With your plan sketched and your transformer sized, it is time to install. The process is methodical and forgiving. Unlike line-voltage electrical work, low voltage wiring is safe to adjust, reconnect, and reroute as you go.
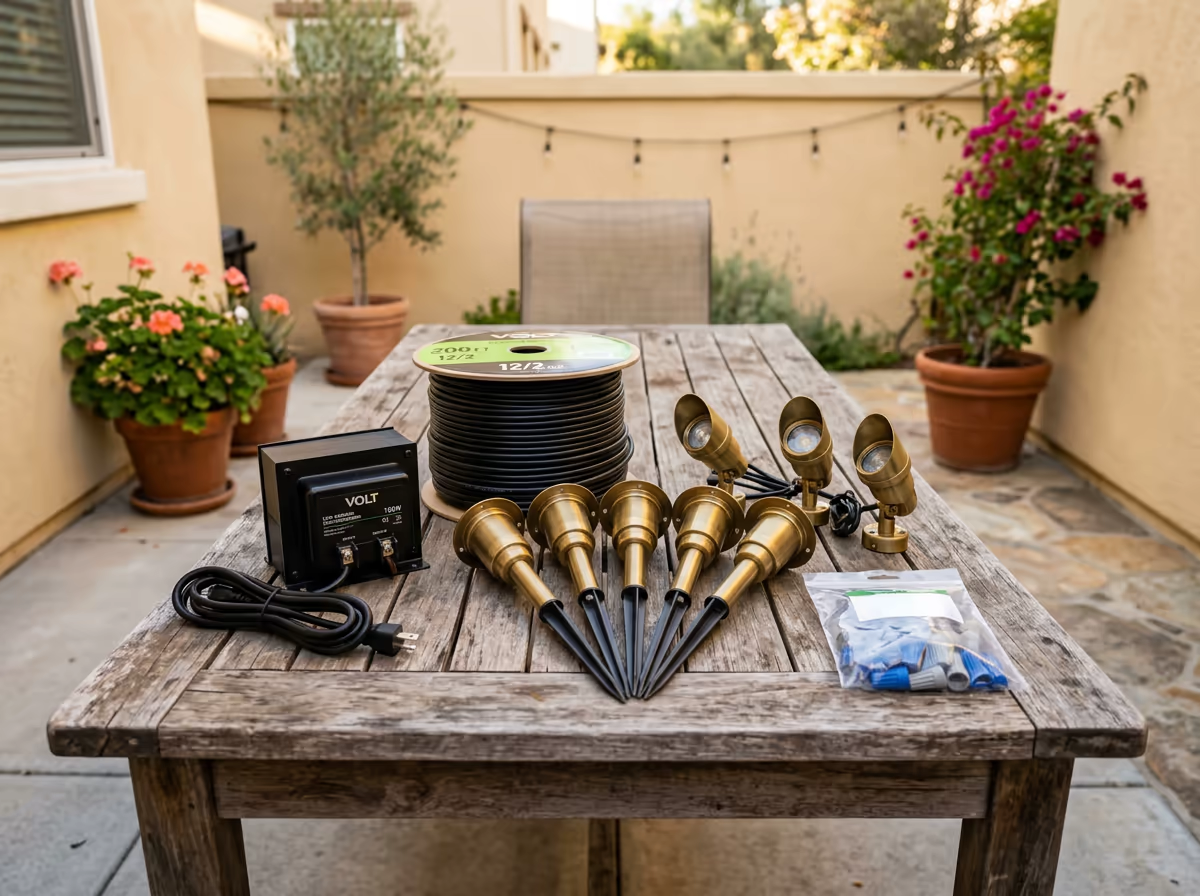
Tools and Materials You Will Need
Step 1: Mount the Transformer
Mount your transformer on a wall, post, or stake near your outdoor GFCI outlet. Position it at least 12 inches above the ground and within reach of the outlet's cord length. Do not plug it in yet.
Step 2: Lay Out Your Fixtures
Place all fixtures in their planned locations without connecting anything. Walk the yard and evaluate spacing, angles, and sight lines. Adjust positions now while everything is still loose. For pathway lights, space them 8 to 10 feet apart along both sides of the path (staggered, not lined up directly across from each other). For spotlights, position them 1 to 2 feet from the base of the tree or feature they will illuminate.
Step 3: Run Your Wire
Starting at the transformer, unroll your landscape lighting wire along the path to each fixture. There are two common wiring layouts:
Daisy chain (series): One wire runs from the transformer to the first fixture, then continues to the next fixture, and so on down the line. Simple to install but can cause voltage drop at the far end of a long run.
Hub (home run): Multiple wire runs leave the transformer, each serving a shorter group of fixtures. Better voltage consistency across the entire system. Ideal when fixtures are spread across different areas of the yard.
For most installations, a combination works best. Run one wire to the front yard pathway lights and a separate wire to the backyard accent fixtures. This keeps individual runs shorter and gives you independent control if you add a multi-zone timer later.
Step 4: Connect Fixtures to Wire
Using waterproof gel-filled connectors (the kind that pierce the wire insulation and seal against moisture), attach each fixture's lead wire to the main cable. These connectors are designed for landscape lighting: you clamp them onto the wire, and internal gel fills around the connection to prevent corrosion. No wire stripping required for most connector types.
Step 5: Connect Wire to Transformer
Strip about half an inch of insulation from the end of each wire run. Insert one conductor into one terminal and the other conductor into the second terminal on your transformer. Tighten the terminal screws firmly. If your transformer has multi-tap terminals, start with the 12-volt tap. You can move to a higher tap later if distant fixtures appear dim.
Step 6: Test Before You Bury
Plug in the transformer and turn on the system. Walk your entire layout and check every fixture. Confirm that each light is working, the brightness is consistent from the first fixture to the last, and the angles look right from the viewing points that matter (your patio, your front door, the street). Adjust fixture positions and aiming now, while wire is still on the surface.
GOOD TO KNOW
Always test your entire system before burying any wire. Finding a faulty connection or a dim fixture is simple when everything sits on the ground. After burial, troubleshooting means digging. Spend an evening with the lights on, walking the yard from every angle, and making adjustments. This is the most important step in the entire installation.
Step 7: Bury the Wire
Once you are satisfied with the layout, bury the wire at least six inches deep (per standard electrical code guidance). In Southern California's water-wise landscapes, cable routing looks different than in traditional lawns:
Through decomposed granite or gravel: Use a flat-blade shovel or garden trowel to create a shallow trench. Lay the wire, then rake the material back over it. The loose aggregate makes this easier than digging in soil.
Through planting beds with mulch: Tuck the wire beneath the mulch layer, ensuring adequate depth. The mulch in your garden beds does double duty as cable protection.
Along hardscape edges: Route wire along the edges of patios, retaining walls, and raised beds where a small gap between the hardscape and planting area provides a natural channel. Secure with landscape staples every 3 to 4 feet.
Through compacted soil: Where you need to cross packed clay or established planting areas, a narrow trench at least six inches deep keeps wire protected. In Southern California, you do not need to worry about freeze-thaw cycles cracking connections or heaving wire to the surface, which is one advantage of our mild climate. UV exposure on any wire left above ground is the bigger concern: bury it or cover it with mulch.
Step 8: Set Your Timer and Enjoy
Program your transformer's timer or connect a smart plug to automate the system. A common schedule for Southern California: lights on at sunset, off at 11 p.m. on weeknights, off at midnight on weekends. Photocell sensors eliminate the need to adjust the timer seasonally, since they respond to actual light conditions rather than a fixed clock.
"Define those important zones that link the elements of a garden, providing room to get in and out of those spaces, and designing each area as its own unique experience."
— David Gomez, Water Efficiency Specialist, IRWD
What Are the Best Lighting Techniques for Water-Wise Southern California Yards?
Here is where low voltage landscape lighting and drought-tolerant landscaping create something special together. The sculptural forms, textured surfaces, and architectural plantings that define water-wise Southern California yards produce more dramatic lighting effects than traditional lawns ever could. A flat expanse of grass under light looks like a flat expanse of grass. An agave under a spotlight casts shadows that belong in a gallery.
Uplighting Native Plants and Succulents
Position a spotlight at the base of a plant and aim it upward into the canopy or form. This technique reveals structure that goes unnoticed during the day.
Path Lighting Through Drought-Tolerant Landscapes
Pathway lights in a water-wise yard illuminate surfaces you chose intentionally: decomposed granite, flagstone, gravel, or stepping stones set in ground cover. Unlike grass paths where light simply bounces off green, these materials reflect and scatter light in ways that add warmth and texture to the entire surrounding area.
Space path lights 8 to 10 feet apart, staggering them on alternating sides of the walkway. Position each fixture 6 to 12 inches back from the path edge so the pool of light falls on the walking surface rather than on the fixture itself. For decomposed granite pathways, the warm golden tone of the material under 2700K LED light creates an inviting glow that draws people forward naturally.
Accent Lighting for Hardscape and Rock Features
Boulders, dry creek beds, retaining walls, and decomposed granite expanses are central to many Southern California yards. These features respond beautifully to lighting:
GOOD TO KNOW
Drought-tolerant plants with silver, gray, or blue foliage (lavender, sage, blue chalk sticks, silver bush lupine) reflect low voltage light beautifully, appearing to glow against darker backgrounds. Group these plants where your accent lights reach for an effect that looks designed by a professional. Your Yardtopia's plant palette is already doing half the work.
How Do You Maintain Low Voltage Landscape Lighting in Southern California?
One of the genuine advantages of low voltage LED landscape lighting is how little maintenance it demands. LED fixtures have no filaments to burn out, no ballasts to replace, and no significant heat output to degrade surrounding materials. That said, Southern California's specific conditions create a few maintenance habits worth building into your routine.
Monthly: A Five-Minute Walk-Through
Once a month, turn on your system after dark and walk the full layout. Look for fixtures that have tilted, dimmed, or gone dark. Check that no plants have grown to block a spotlight's beam. Confirm that path lights are still visible and upright. This five-minute habit catches small issues before they become troubleshooting projects.
Quarterly: Clean and Adjust
Southern California's dry climate means dust accumulates on fixture lenses faster than in humid regions. A damp cloth wiped across each lens restores full brightness instantly. Trim any new plant growth that encroaches on fixture sight lines. If you notice any fixtures significantly dimmer than others, check their wire connections for corrosion at the connector.
Annually: System Check
Once a year, inspect the transformer for signs of weathering, check all visible wire connections, and confirm that the timer or photocell is functioning correctly. Replace any fixture stakes that have become loose or brittle from UV exposure. Top up mulch around buried cable runs if the layer has thinned below 2 inches, which aligns naturally with your regular fall yard maintenance routine.
Santa Ana Wind Prep
When Santa Ana wind advisories hit, take two minutes to check that directional spotlights have not shifted their aim and that any above-ground wire runs are secure. Tall fixtures on stakes are most vulnerable to wind-driven repositioning. If you live in a fire-prone area, confirm that no fixtures are directing heat toward dry vegetation, though LED fixtures produce so little heat that this is rarely a concern.
PRO TIP
LED landscape lighting fixtures can last 40,000 to 50,000 hours --- many years of nightly use depending on how long your lights run each evening. If a fixture stops working, the issue is almost always the connection (corroded connector or loose wire), not the LED itself. Before replacing a dark fixture, swap it with a working one from a different location to confirm whether the problem is the fixture or the connection. This simple diagnostic saves unnecessary spending.
How Much Does a Low Voltage Landscape Lighting System Cost?
Budget is a fair question, and the answer depends on whether you are doing the work yourself or hiring a professional. The good news: DIY low voltage landscape lighting is one of the most affordable outdoor upgrades with one of the highest returns.
DIY Cost Breakdown
ComponentTypical RangeNotesTransformer (150-300W)$50 to $150Higher-end models include WiFi and multi-zone timersLED path lights (each)$15 to $40Quality varies significantly; brass and copper fixtures last longestLED spotlights (each)$20 to $60Look for adjustable aim and at least IP65 weatherproof ratingLandscape lighting wire (100 ft)$20 to $4012-gauge for most runs; upgrade to 10-gauge for runs over 100 feetConnectors (pack of 10-20)$10 to $20Gel-filled waterproof connectors are worth the small premiumTotal: 10-fixture starter system$250 to $600Covers transformer, fixtures, wire, and connectors
Landscape Lighting Kits vs. Individual Components
Landscape lighting kits bundle a transformer, fixtures, wire, and connectors into a single package at a lower price than buying components separately. Kits work well for straightforward installations (a single pathway, a small planting bed). For more complex layouts that mix path lights and spotlights across multiple zones, buying individual components gives you better quality control and exactly the fixtures you need.
Professional Installation
If the project scope exceeds your comfort level, if you need new electrical outlets, or if your property has complex terrain, a professional landscape lighting installer brings design expertise and electrical knowledge that ensure a clean, lasting result. Professional installations in Southern California typically range from depending on the number of fixtures and complexity of the layout. The investment often pays for itself in a more polished design that increases home value.
GOOD TO KNOW
Landscape lighting is one of the highest-return outdoor investments. Industry research shows that well-designed outdoor lighting delivers meaningful cost recovery in added home value. Beyond resale numbers, the nightly enjoyment of a beautifully lit yard is the return that actually matters to most homeowners. Your Yardtopia deserves to be seen after dark.
Frequently Asked Questions
How many lumens do you need for landscape lighting?
For path lights, 100 to 200 lumens per fixture provides comfortable visibility without harsh glare. For uplighting trees and architectural features, 200 to 400 lumens works well depending on the size of the subject. For spotlighting a large tree canopy, you may need 500 lumens or more. Start with lower-output fixtures and increase only if the effect feels insufficient. Overlighting is the most common beginner mistake.
Can you install low voltage landscape lighting yourself?
Yes. Low voltage systems operate at 12 volts, which is safe to handle without risk of electrical shock. The transformer plugs into a standard outdoor GFCI outlet, and all downstream wiring and connections can be done by a homeowner with basic tools. The one exception: if you need a new outdoor GFCI outlet installed, hire a licensed electrician for that specific step.
How much does landscape lighting cost for an average yard?
A DIY 10-fixture low voltage LED system typically costs between $250 and $600 for all materials. Costs scale with the number of fixtures, the quality of materials, and the complexity of the layout.
What is the best color temperature for landscape lighting?
Warm white in the range of 2700K to 3000K is the standard for residential landscape lighting. This temperature produces a soft, golden tone that complements natural materials and creates a welcoming atmosphere. Avoid "daylight" or "cool white" bulbs (4000K and above) for landscape use, as they cast a bluish tone that feels clinical rather than inviting.
How far can you run low voltage landscape lighting wire?
With 12-gauge wire, runs up to 100 feet from the transformer maintain consistent brightness for most LED installations. For runs longer than 100 feet, upgrade to 10-gauge wire to reduce voltage drop. Using your transformer's higher-voltage taps (13V, 14V, 15V) also compensates for long runs. If you need to reach fixtures more than 150 feet from the transformer, consider a hub wiring layout with multiple shorter home runs.
How do you set a landscape lighting timer?
Most modern transformers include a built-in timer that you program directly on the unit. Set the "on" time to sunset (or use the photocell option, which detects dusk automatically) and the "off" time to your preferred shutoff. For the simplest approach, connect a smart outdoor plug between the outlet and transformer, which lets you control the schedule from your phone and adjust seasonally without walking to the transformer.
Do solar landscape lights work well in Southern California?
Solar path lights and accent lights work exceptionally well in Southern California thanks to 280 or more sunny days per year. Solar panels charge efficiently even during shorter winter days. The main limitation is brightness: solar fixtures produce less light than wired low voltage fixtures and are not suitable for accent lighting or uplighting that requires higher output. A practical approach is to use solar for pathways and low voltage for accent and feature lighting.
The Bottom Line
Low voltage landscape lighting is one of the most rewarding weekend projects you can take on. The system is safe to install, forgiving to adjust, and designed to grow with your vision over time. Southern California's year-round outdoor season means you will enjoy the results 365 evenings a year, and your water-wise landscape's sculptural plants and textured hardscapes create lighting effects that traditional yards simply cannot match.
Start with these steps: